Saturday, October 25, 2008
Drat!
Do you ever click on "Publish Post" when you actually meant to click on "Save"? I've just done it twice. Sorry.
Statement of Principle
 Late October 2008
What? With the world in virtual financial collapse, wars and cultural conflicts threatening the lives of millions, perhaps billions, I'm making a statement of principle about gardening? What sort of silliness is this?
I avoid using the words 'green', 'sustainable', 'sustainability'. They've already been appropriated by the world of business and capitalism, and are well along the way to becoming meaningless. Perhaps I should use 'stewardship' because this is about keeping the earth and enjoying the earth. Perhaps it's best not to use labels, keep quite, and just try to take care of my own bit of the land. I can do without labels, but I can't keep entirely quiet. So herewith, a statement of gardening principles, and a little of my local history.

The Future Garden in Late 2004
A Time for Taking Stock
As the end of the gardening year approaches, refocusing seems in order. Time for a gardening life checkup.
My garden on Federal Twist Road is an experiment.
Apart from clearing the land of close-packed weedy cedars to make space for a garden, I take the land as given - no soil improvement, no measures to change the heavy, wet clay, no mass extermination of existing plant life, no change in natural drainage patterns, no fertilizers. My goal is to make the most of what I have - to create an artificial wet prairie with a self-sustaining community of plants appropriate to this place and its environment, and a habitat for wildlife. Most of the plants are native, but there are also many exotics - because they will grow here, because they are appropriate for this environment, and for aesthetic reasons (and to satisfy the desires of a plant mad gardener).
The constraints of the site - very wet, saturated clay particularly in winter, surrounding woods that reduce direct sunlight, a cold microclimate that retards plant growth in spring - limit plant choices and force a lot of trial planting just to see what will thrive.
I don’t fool myself into thinking this experiment is a wholly idealistic, or scientific, endeavor. It’s a practical matter of time and money. I can garden only on weekends, and money to purchase plants and pay for labor is limited. My ultimate goal is a garden that is relatively self-sufficient.
Why Here?
We fell in love with the house and its location. A 1965 mid-century reminiscent of Frank Lloyd Wright in his Usonian phase, the house and its secluded location amid 19 acres of preserved woodland are what originally attracted us. Designed by a notable local architect, William Hunt, the house has a wall of windows at the back overlooking the main part of the garden and surrounding woodland. It clearly refers to both Japanese and Arts and Crafts design conventions, both of which are associated with naturalistic settings. Visually, the house is an unobtrusive presence from outside; its gray wood siding and low profile blend easily into the forested location. The house is so unobtrusive, one contractor we hired told me he had been driving past for 20 years but had never realized a house was here.

View Out to Garden
From inside, the ample fenestration brings the outside in, even in winter when a surrounding snow cover can provide special delight. The hope for a new future, the tranquility of the wooded location, and the immediacy of the experience of nature won out. We bought, and moved the four miles from Rosemont.
While we were thinking about moving, I did have doubts. What had been a view across an open field in 1965 had become congested with 50-year-old cedars, and the change to a mixed hardwood forest was immanent. I counted trees and guessed we would need to cut down 80 or 90, mainly weedy cedars, just to get less than an acre of open space.
I understood that making a garden in this place would not be easy, and I certainly regretted giving up my Oudolf-inspired garden in the nearby hamlet of Rosemont, but I felt up to making a change. An opportunity for a new garden!
Garden Practice
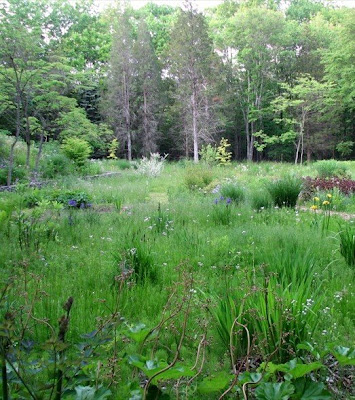
A naturalistic garden seemed most appropriate to the style and location of the house. Anything remotely formal, other than some topiary shapes to provide sharp contrast with the surrounding wildness or some kind of symbolic structure or artwork, would be out of place. I started by planting directly into the existing matrix of plants, figuring the weeds I already had would suppress potential new weeds lurking in the seed bank and maintain existing stable groundcover as I developed the garden over the next several years. (I quickly discovered that many of the existing 'weeds' consisted of highly desirable Carex communities, Scirpus, Juncus, Sysirinchium, Lobelia syphilitica, fleabane.) My aim is to develop communities of more desirable and ornamental plants that will form a new weed-suppressing matrix.

Planting Directly into the Existing Matrix - Summer 2006
I took help wherever I could find it, mainly from books. For sizing the garden area and establishing spatial relationships to the house, John Brookes' many books on garden design were extremely valuable. For approaches to plant selection and planting design my main sources were Oudolf and Kingsbury's 'Planting Design: Gardens in Time and Space', Kingsbury's 'The New Perennial Garden', Hansen and Stahl's 'Perennials and their Garden Habitats', 'Dynamic Landscape: Design, Ecology and Management of Naturalistic Urban Planting' edited by Nigel Dunnet, King and Oudolf's 'Gardening with Grasses', and Rick Darke's 'The American Woodland Garden: Capturing the Spirit of the Deciduous Forest' and 'The Encyclopedia of Ornamental Grasses'. There are many others, of course. Most of my sources were European simply because I could find the information I needed there, Rick Darke being one notable exception. (One might ask what this says about much of American garden writing.)
Plants remain standing over winter to provide visual interest and as a framework to display ice and snow. In the early spring I burn plants I can safely put flame to (historically appropriate prairie practice) and cut down the rest using electric hedge clippers, leaving the remains in place as a mulch and to gradually increase the organic content of the soil. This leaves a rather dismal view for a few weeks until the early irises and grasses begin to provide some visual interest.

The Garden after the Early Spring Slash and Burn
Results
After three years of work planting, building stone walls, and this year making a small pond, the garden is nowhere near completion but it does achieve moments of beauty, and it is thriving without the kind of intensive intervention typical of more conventional gardens. I have found that many perennials have a hard time getting established in my stressful environment; large plants, though they are expensive, have much greater success.

Moments of Beauty
Although my conditions are not conducive to successful seeding, I've found that many seeds do germinate in the second year following random broadcasting and I now have communities of iron weed (Vernonia noveboracensis), cup plant (Silphium perfoliatum), and Great Blue Lobelia (Lobelia syphilitica) established from seed. I'm still lacking sufficient groundcover plants to complete the matrix planting, and that is a challenge I will continue to focus on next year.
Some weeds do still make life difficult, especially Japanese stilt grass (Microstegium vimineum), which usually covers virtually the whole garden by season's end. This year I got the upper hand (I think). Using repeated cutting and hand pulling, I prevented most of the grass from seeding. Since it's an annual, I hope to see less of it next year, and to entirely eliminate it in in a few years.
Principles
So... these are the principles I'm using to develop my garden:
- Consider the culture and history of a site before designing a garden
- Use plants appropriate to existing ecology and environmental conditions
- Establish self-perpetuating plant communities, keeping watch for overly competitive or invasive behavior
- Intervene minimally
- Don't use supplemental watering (except when needed to establish new plantings)
- Don't fertilize - use only compost and allow organic matter from previous years to decay in place (unless diseased)
- Make aesthetically appropriate design decisions (make it pleasing to the senses)
- Provide habitat for wildlife
Please don't take offense. This list is for me, not you - to help me keep on track, measure progress, and decide when change is needed.
Tuesday, October 21, 2008
Shirl's visit to Pensthorpe
Shirl of shirlsgardenwatch has a great post on The Millennium Garden designed by Piet Oudolf at Pensthorpe in Norfolk, England. Lots of images and, even more, a movie clip that gives those of us not fortunate enough to have actually visited a much better understanding of the scale and layout of the plantings. Click on Shirl's Oudolf photo below to link to her post.

Saturday, October 18, 2008
Autumn incidents
A chill is in the air. A box of bulbs was waiting at the door when I got home last night. I need to start planting them and finish fall chores. But there's still time to enjoy the changing garden scene.
Morning
This is a view into the little hollow to the east where morning mist clearly delineates the declining angle of the sunlight.
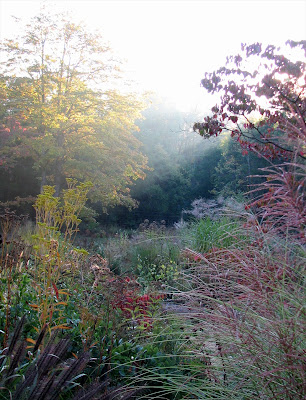
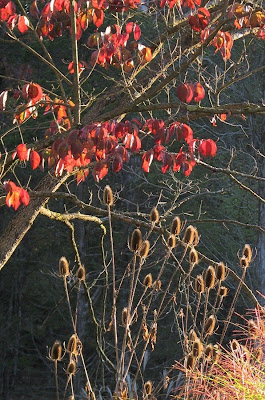
An old dogwood, teasel, and miscanthus catch the light.
Afternoon
Miscanthus giganteus, at about fourteen feet, against the blue sky.

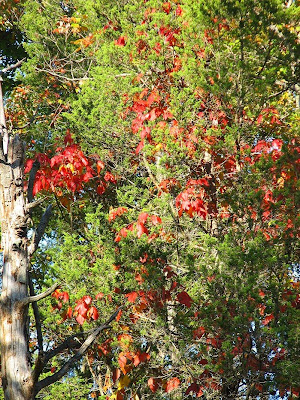
Poison ivy climbing a cedar.
Large Miscanthus 'Silberfeder' with M. 'Ferner Osten' in the foreground, and M. 'Adagio' on the right.

Backlit by late afternoon sun, the wall of woods surrounding the garden lets in more light as the foliage falls.

Morning
This is a view into the little hollow to the east where morning mist clearly delineates the declining angle of the sunlight.

An old dogwood, teasel, and miscanthus catch the light.

Afternoon
Miscanthus giganteus, at about fourteen feet, against the blue sky.

Poison ivy climbing a cedar.

Large Miscanthus 'Silberfeder' with M. 'Ferner Osten' in the foreground, and M. 'Adagio' on the right.

Backlit by late afternoon sun, the wall of woods surrounding the garden lets in more light as the foliage falls.

Tuesday, October 14, 2008
Garden Diary: limbing the cedars
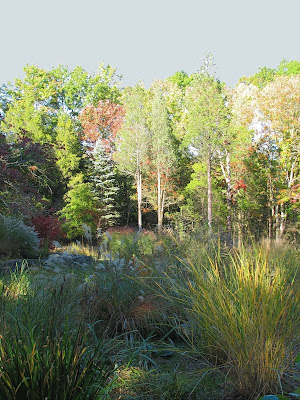
Last June I posted a photo of cedars (Juniperus virginiana) with tangles of dead limbs. Pruned up to the green canopy, the trees could be an asset. But these were a mess. Half their branches looked, and were, dead. They spoiled the view. You can see the trees could make striking verticals - if they were cleaned up a bit (well, a lot).
In a moment of folly, knowing I probably couldn't afford it, I asked Bruce of Paxson Hill Farms if he could do the job. He did. Last Friday. (If you live near the New Hope (PA)-Lambertville (NJ) area, Paxson Hill is a little piece of paradise on top of a hill above the Delaware, and a nursery with a truly unique (I really mean 'unique' - no exaggeration) selection of plants, plus peacocks, guinea hens, Imus, white turkeys, assorted other animals, and a park-like garden of streams, waterfalls, a pavilion on a hill.)
Here are the results. A bad photo taken with the sun too high and bright, but I hope you get the point. By removing the lower branches, all the space around the trees has been opened for planting.
Now I have a new area of the garden to think about over winter - well, to obsess about. The next image is a close-up view of the newly trimmed trees. The little cedar in the middle will be cut down.
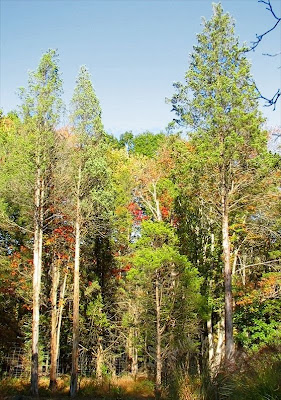
This will create even more open area, almost certainly for a naturalistic planting, though I'm not yet sure what that might be. Here's another view that better shows how the area has been cleared (imagine you can see through the Miscanthus). I think I'll be spending time this winter with Rick Darke's The American Woodland Garden.
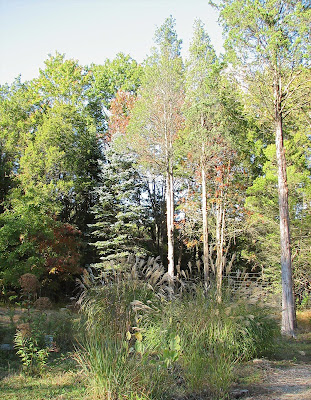
All this is part of my long-term plan to find more ways to open the garden into the surrounding woods, turning what was a crowded woodland into an open garden with a big piece of sky. The big job of clearing was done three years ago. Now I continue to whittle away to create openings, more space and more light wherever the wall of forest can yield.

In a moment of folly, knowing I probably couldn't afford it, I asked Bruce of Paxson Hill Farms if he could do the job. He did. Last Friday. (If you live near the New Hope (PA)-Lambertville (NJ) area, Paxson Hill is a little piece of paradise on top of a hill above the Delaware, and a nursery with a truly unique (I really mean 'unique' - no exaggeration) selection of plants, plus peacocks, guinea hens, Imus, white turkeys, assorted other animals, and a park-like garden of streams, waterfalls, a pavilion on a hill.)
Here are the results. A bad photo taken with the sun too high and bright, but I hope you get the point. By removing the lower branches, all the space around the trees has been opened for planting.

Now I have a new area of the garden to think about over winter - well, to obsess about. The next image is a close-up view of the newly trimmed trees. The little cedar in the middle will be cut down.

This will create even more open area, almost certainly for a naturalistic planting, though I'm not yet sure what that might be. Here's another view that better shows how the area has been cleared (imagine you can see through the Miscanthus). I think I'll be spending time this winter with Rick Darke's The American Woodland Garden.

All this is part of my long-term plan to find more ways to open the garden into the surrounding woods, turning what was a crowded woodland into an open garden with a big piece of sky. The big job of clearing was done three years ago. Now I continue to whittle away to create openings, more space and more light wherever the wall of forest can yield.
Monday, October 13, 2008
Chiaroscuro in Autumn

Seven a.m. on a Saturday morning. This is grass season.
At this time of year the low morning sun creates a rich chiaroscuro of lights and darks. The sunlight is starting to bleed through the forest trees, sending transient shafts of light into the garden. Showing this in a photographic image is next to impossible. The scale is hard to establish for a viewer, and the colors and detail can only be seen if you enlarge the photo. Would you think the view above is probably 250 feet wide in the middle distance and three to four hundred feet deep?
Something about this reminds me of the sun-haunted paintings of the Hudson River School - the light settling in the clearing at this moment of stillness, poise, as we approach the autumnal equinox. But this is stillness with a bit of fireworks...when you see the grasses close up, shooting out plumes of white and red. An apparent contradiction here of images of motion in stillness, over abundance, too much fullness turning this peaceful morning into a memory of turmoil.

And here a bright spot of grasses contrasted with dark trunks of dogwoods, the light turning up the color engine, preparing for...

bursts of colors - here Panicum 'Cloud Nine', golden bracken, a maple branch.

And from the other side, Rudbeckia maxima foliage against the most golden bracken around.

One more: a glimpse of the berryland I'm planting between the house and the garden - Ilex verticillata 'Winter Red', Itea virginica, Aster tartaricus 'Jin Dai'.

Monday, October 06, 2008
Garden Diary: Making a natural clay pond

Placing the Pond
At first I wanted the pond to be far out from the house. I thought it should become a destination. But I waited and observed the land. I let it tell me where the pond should be.
Stormwater runoff from the slope above us flows like a flood during wet weather and is directed by the contour of the land, as you can see in the photo above, around the end of the little hill on which the house sits. It was clear a pond in this area would be repeatedly filled whenever it rained. Availability of a natural source of water was ultimately the deal breaker. The pond would go here.
Considering the constraints of the space, I decided on a canal-like shape, long and narrow, with a couple of barely suggested S curves. I started by outlining the pond with a garden hose in the fall of 2007 and left it there over the winter. I couldn't dig while the ground was frozen, so I was forced to look at the shape for a long while. That was good. It gave me time to be sure.
Over that winter I reconsidered using a liner, but a natural pond a couple of hundred feet out in the woods was proof enough to me that an unlined pond could hold water in our heavy clay. This evidence of natural impermeability, coupled with a high water table, and a ready source of rain water, gave me the confidence to proceed without a liner. Even with some leakage, I thought the runoff would keep the pond full, and that has proven to be true. Lesson learned: put the pond where conditions are appropriate.
The dry laid stone wall at the base of the house was finished in February. I understood the wall would make a curve, but I hadn't anticipated its visual power. Figuratively speaking, it creates the feel of a centrifugal force that "throws" the eye around the curve, down the length of the pond, and into the distance. That shape helped me finally decide on the exact shape and position for the pond, and I juggled, poked and prodded the hose quite a bit as the digging proceeded.
Having the pond close under the house was a good decision. I can enjoy it from the terrace above without leaving the area of the house, and the pond has given me a new entry point, entirely changing my original concept of how to enter the garden.
Building the Pond
We started digging the pond during a late February thaw. This part involved a lot of improvisation. After we dug the far end of the pond, it completely filled with water overnight.

I decided to leave a foot-wide dam of earth in place, dig the second part ...

... leave another earthen dam to hold in the water, then dig the third section.

This work could have been completed in three days, but my diggers could come only occasionally. Allowing for bad weather and my helpers' schedules, it took about six weeks to finish the project.
Joining the Compartments
Once the pond was finished, all three compartments were full of water, so we needed a day just to join them. We used a small pump made for emptying flooded cellars to do the job, then dug out the dams between the compartments. We used this earth to make the dam we discovered we needed at the far end to raise the water to an appropriate level.

The Dam
One thing I couldn't measure in advance was the change in land elevation from the upper to the lower end of the pond, a distance of about 40 feet. As the pond was completed, it quickly became clear the change in land elevation from the bottom end to the top was a serious problem. The simplest solution was to build a dam at the lower end. This raised the water level about 8 inches and allowed the entire pond to fill to a satisfying level. The next photo shows the beginning of the dam on the left.

The dam was easy to make using excess earth from the pond excavation. We simply piled up the earth around the lower end of the pond, tamped it down, then added more until we achieved an acceptable elevation. To prevent breaks, I made the dam wide, four to five feet in places, wet it thoroughly, and repeatedly walked over it to compress the earth as much as possible. I placed a few rocks in strategic positions to help hold the dam in place initially, until it settled and stabilized, and started planting the dam slope to further stabilize it.
The Drain
Another danger was water overtopping the dam and washing it away during a heavy storm. To prevent that, I bought a cheap five-inch flexible plastic drainage pipe from Home Depot and installed it in a small channel I dug at the side of the pond, just above the dam. I placed the pipe at an elevation that would keep the pond full, but would allow any excess water to drain out well before it reached the top of the dam. I used rocks to visually screen the pipe opening at the pond end and at the outlet end, and recovered the length of pipe with earth. This was a very simple, but absolutely critical, operation that took only about 30 minutes. In the following photo, the outside end of the drain is shown covered by a rock in the middle right, with drainage water flow visible below the rock. You may need to click on the photo to see this detail.

I used a rather wide pipe to be sure it had capacity to carry off sufficient water, even in very heavy rainstorms, to prevent overtopping the dam. This was a hit or miss operation since I don't have the mathematical skill to calculate drainage volumes. I decided I would keep close watch and, if I ever saw the water approach the top of the dam, I would simply add another drainage pipe, but this has not been necessary.
Pond Depth
A large boulder in the lower end of the pond dictated a maximum depth of about 30 inches. We simply couldn't get that rock out of the ground, and I wanted to avoid the expense, inconvenience, and damage of bringing in equipment heavy enough to do that job. The pond bottom rises considerably moving from the lower to the upper end, where the water depth is only about ten inches.
I wanted to keep the upper end shallow to make it possible to create a sort of beach where birds and other animals could easily get to the water.
"Naturalizing" the Pond
Planting the pond edge was easy. I quickly added two large clumps of Darmera peltata, Ligularia 'Othello', several water loving irises, ferns, Pontadera cordata, Spartina pectinata 'Marginata', Chrysogonum virginianum 'Eco-Lacquered Spider', Carex muskingumensis 'Oehme', and assorted other plants that came my way.
In the next photo, the native, and highly invasive Equisetum arvense had crowded the pond edge in only four to six weeks. The scum on the water surface is tree pollen, distasteful but soon gone.

The next photo, taken at about the same time, shows how quickly the pond area revegetated.

By the end of May, frogs were present in abundance.

The final photo shows the pond at four months, near the end of July. We used wood chips to create a sitting area on the right, between the pond and the stone wall, and to build a path from the upper terrace, around the curved stone wall, to the pond, and continuing off into the larger garden. This has created a new point of entry into the garden, and a new focal point from which the rest of the garden, in a metaphorical sense, "flows".

Wednesday, October 01, 2008
Garden Diary: the bank

No, not that bank. Not the one about to collapse into financial ruin. This is the bank around the house; the one that lifts the house above the wet garden below.
I has a rather wild and woolly look. I've been working on a planting of Miscanthus sinensis 'Gracillimus' and Pycnanthemum muticum, with a few scattered perennials mixed in for other season interest - Joe Pye, Baptisia australis, sanguisorba, a few legacy peonies - and a focal Viburnum plicatum 'Mariesii' at the corner, and it's all just fine until autumn when the miscanthus flowers and starts falling apart. At this time of year, I wish I could stop the flowering and just keep the simple mounded shape.

Visually, miscanthus is appropriate. It complements the strong Japanese influence in the design of the house (built in the mid 60's), or I like to think so. But I'm also thinking about replacing it with a lower, more lasting structured panicum such as 'Shenandoah'. Or taking a complete change in course.
The bank is the only planting area I have that isn't saturated most of the year, so I could take advantage of that and grow a mixture of flowering and berried shrubs (caryopteris, hollies) and an entirely different selection of perennials. Maybe a steppe planting like the one at Lady Farm? Whatever I do, I want a planting that will look good in all seasons and will last years with little maintenance.
 I do want to keep the dogwood screen at the bottom of the bank. They are great for wildlife, mainly as perches for all kinds of birds, even hummingbirds, and they provide a sense of shelter - a "treehouse" effect - and separation from the garden proper.
Any suggestions?
Subscribe to:
Posts (Atom)